We walk you through the basics of Google Analytics key event (conversion) tracking and show you how to quantify the results of your marketing efforts.
Important note: Google has renamed conversions to “key events” to unify terminology across Google Analytics and Ads. This change aims to streamline the experience for users who work with both platforms, making it easier to understand and navigate the analytics data. Moving forward, we will refer to conversions as ‘key events’.
Google Analytics has long reigned as the go-to analytics platform.
Our data backs it up. 90% of marketers consider Google Analytics their go-to solution for website tracking.
Its ability to track key events and attribute them across various channels is a feature favourite.
But with growing privacy regulations like GDPR, browser restrictions, and users jumping between different channels, is GA4 still the best solution for measuring marketing’s impact on key events like leads?
In this article, we explore how GA4 tracks key events, share some best practices, and point out where it misses the mark.
Here’s what you can expect:
💡 Pro Tip
Key event tracking in Google Analytics is a good start, but it doesn’t show how leads translate into revenue. And, with the customer journey becoming more complex—people engaging across platforms and viewing ads before converting—Google often credits bottom-of-funnel activities like direct and brand search, ignoring TOF efforts.
A tool like Ruler solves this by tracking data at the visitor level, attributing leads and revenue to the right campaigns, ads, and keywords. Plus, with probabilistic measurement, you can reassign credit to the channels that actually drove conversions.
Book a demo to learn more
Key events in Google Analytics is basically any important action you want your users to take on your site. It’s an event for your business, and you can track and label pretty much any user interaction as a conversion.
For example, you can track:
Key event tracking in GA4 is different from the previous Universal Analytics. Back in the day, conversions were tied to goals, like when someone reached a specific landing page (e.g., a thank you page).
Now, with GA4, you have unlimited events, unlike Universal Analytics, which limited you to 20 goals per reporting view.
Plus, you can set up complex sequences within a single event.
For example, you can track a user landing on your site from a newsletter and making a purchase as one event, rather than two separate goals as you would have in Universal Analytics.
As we’ve just discussed, goals are no longer a viable option to track conversions.
Everything is now an event—even sessions and pageviews.
Related: Complete guide to events in Google Analytics 4
In GA4, you’ve got three types of events:
Important note: For this guide, we’ll assume that you’ve already set up your Google Analytics 4 account. If you haven’t, don’t worry. We have a complete guide that lists all the best practices for setting up GA4.
One of the most common event marketers track in GA4 is form submissions. They usually do this by setting up a trigger for when someone lands on a thank you page after filling out a form.
That’s exactly what we’re going to walk you through using custom events.
Log into your Google Analytics 4 account. Head to Admin > Data Settings > Key Events.
Hit the “Create Event” button.
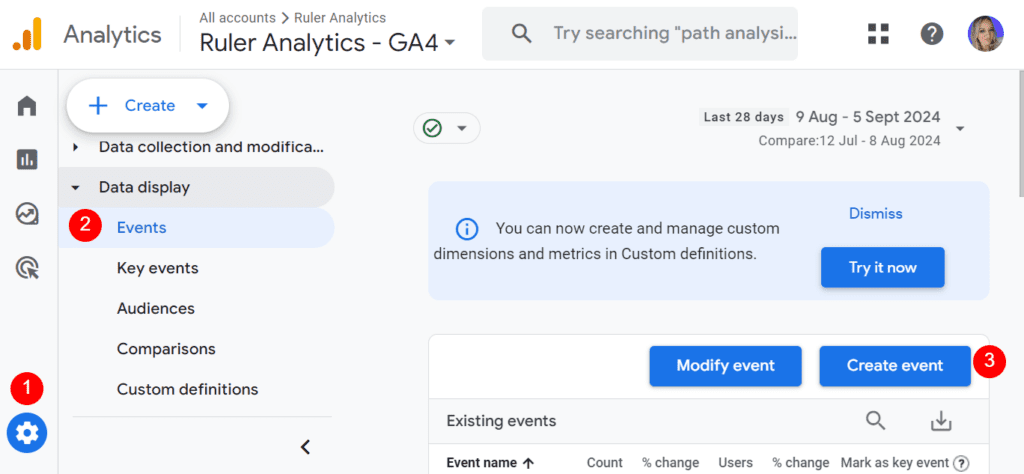
First, give your event a name. Something simple like ‘demo_booked’ works well if you’re tracking visits to a thank-you page after a demo form is filled out.
Under Matching conditions, set the Value to “page_view” to specify the type of event you’re targeting.
Let’s say your thank-you page is www.mybusiness.com/thank-you. To ensure you’re only tracking page views on this specific page, you’ll need to click “add condition.”
For the parameter, type in “page_location.” Choose “contains” from the drop-down menu and put your page name (e.g., /thank-you) in the value field.
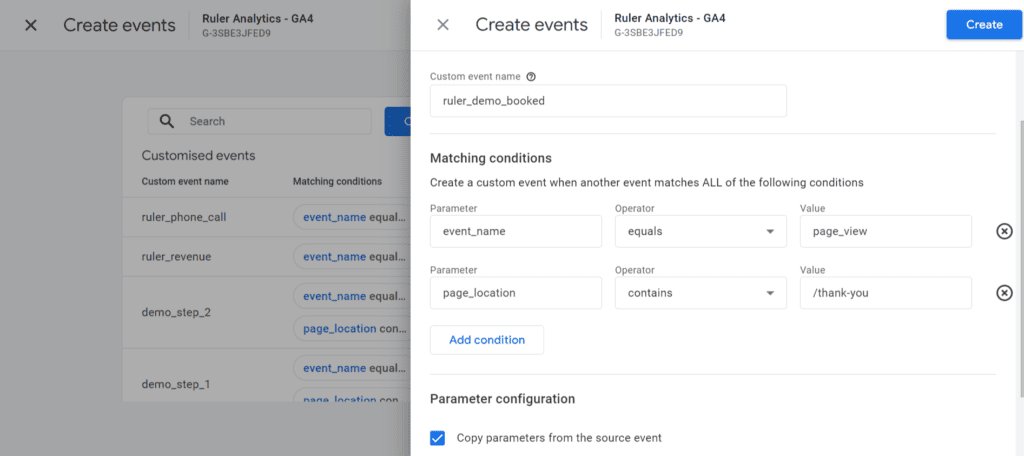
If you want to copy all the details from the original page_view event, keep the “Copy parameters from the source event” box checked. This is usually a good idea.
Once you’ve set everything up, click “Create.”
You’ll find your custom event in the custom events table. Simply use the toggle to mark it as a “key event”, and you’re all set.
Next, head over to “Key Events” under “Data Display” to see your new event listed. It might take a little while for it to show up—sometimes up to 24 hours—so be patient if you don’t see it right away.
Another option is to configure a new tag in Google Tag Manager that will successfully capture and report a unique event in GA4.
This method gives you a lot more flexibility and control over your conversions.
For this example, let’s say you have a form on your website that doesn’t redirect to a new page.
You could configure your event in Google Tag Manager to track the submission button as a conversion instead.
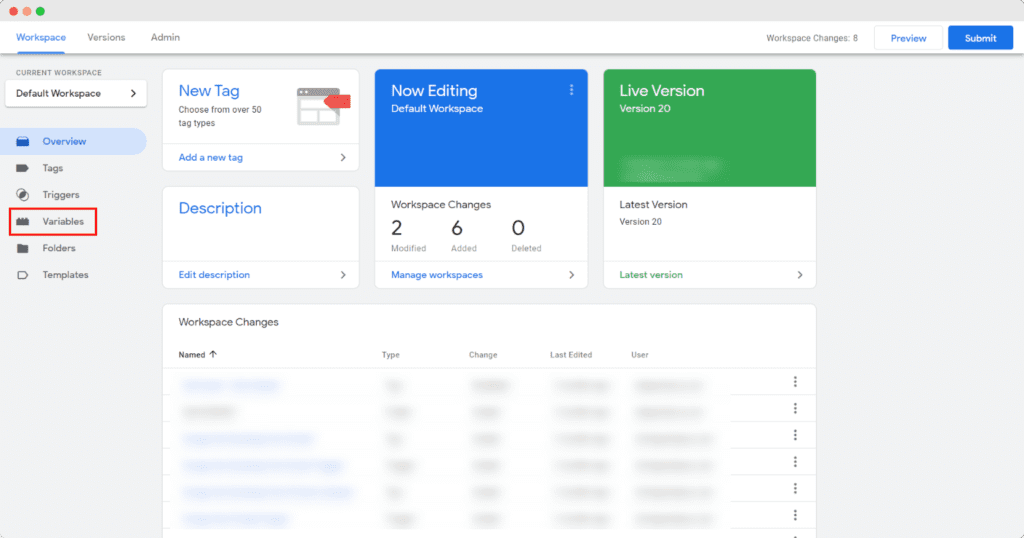
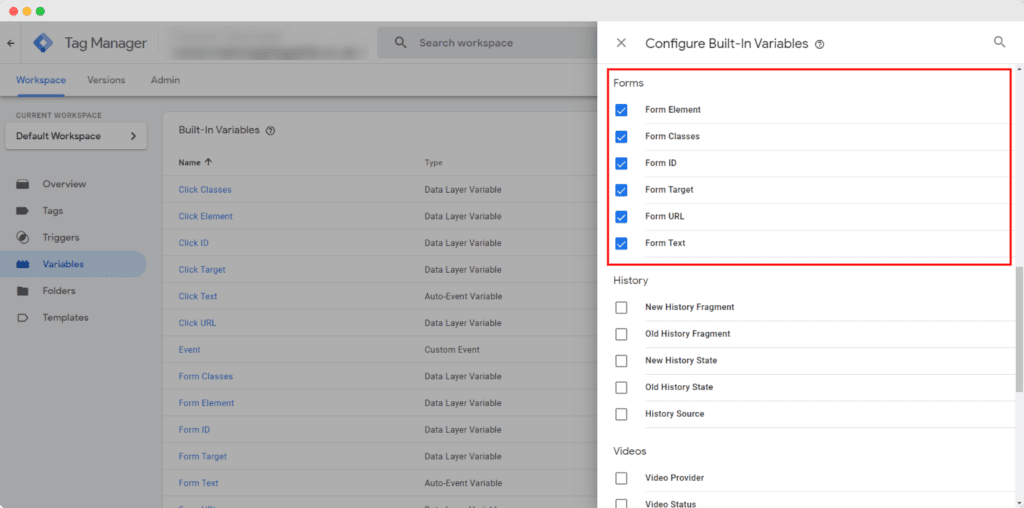
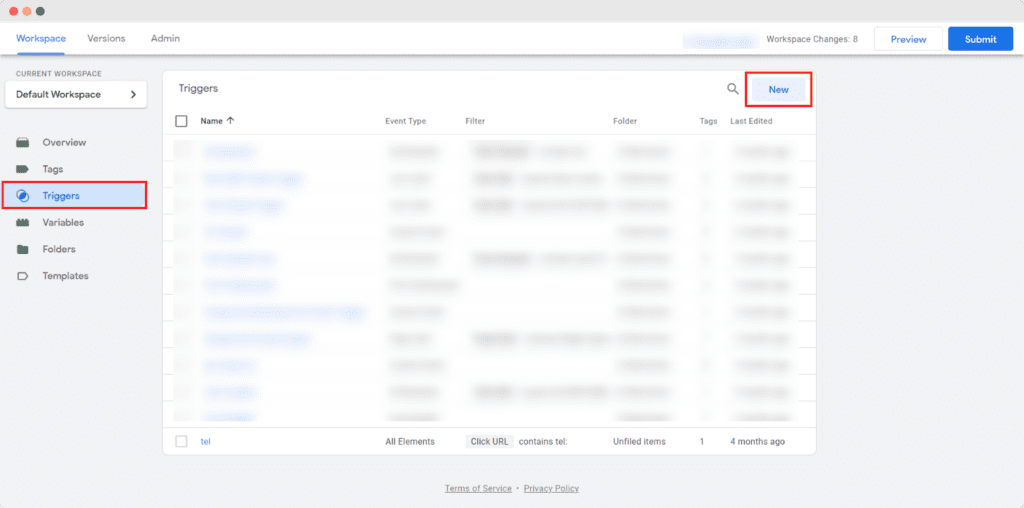
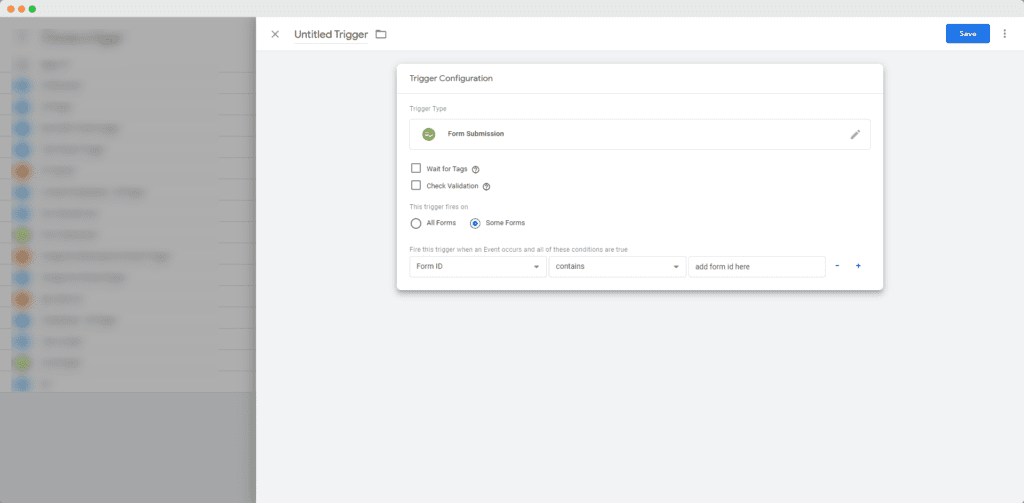
3. Afterwards, you’ll need to click on ‘Triggers’. Here you’ll want to create a generic form submission trigger. This will allow you to see the form submission event inside of Google Tag Manager, and you’ll know which form id to fire your tag and conversion event in GA4.
Once complete, go into preview mode, type in your domain and fill out a form.
If successful, you should be able to see the form submit event and your variables in Google Tag Manager.
You’ll want to scroll down to Form ID and make a note of the code as you’ll need this later on in this set up.
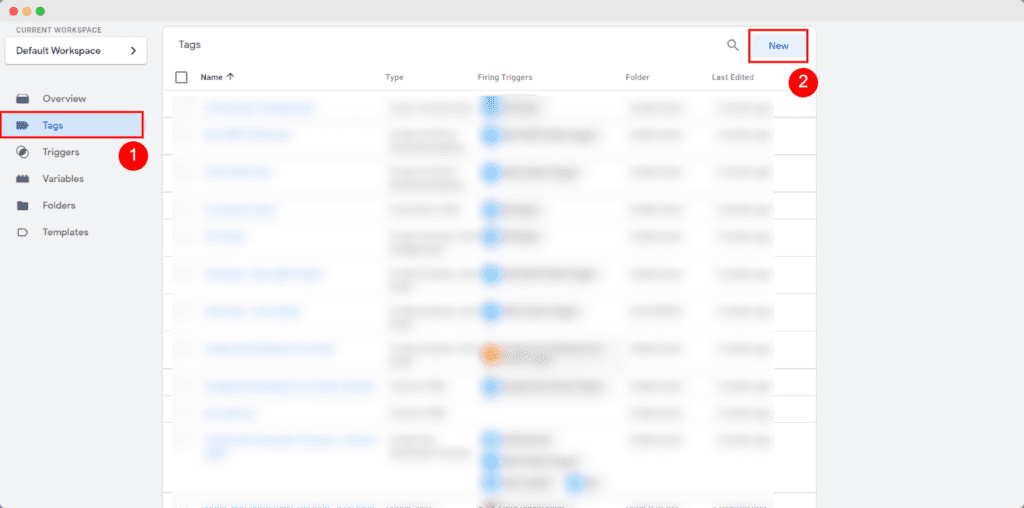
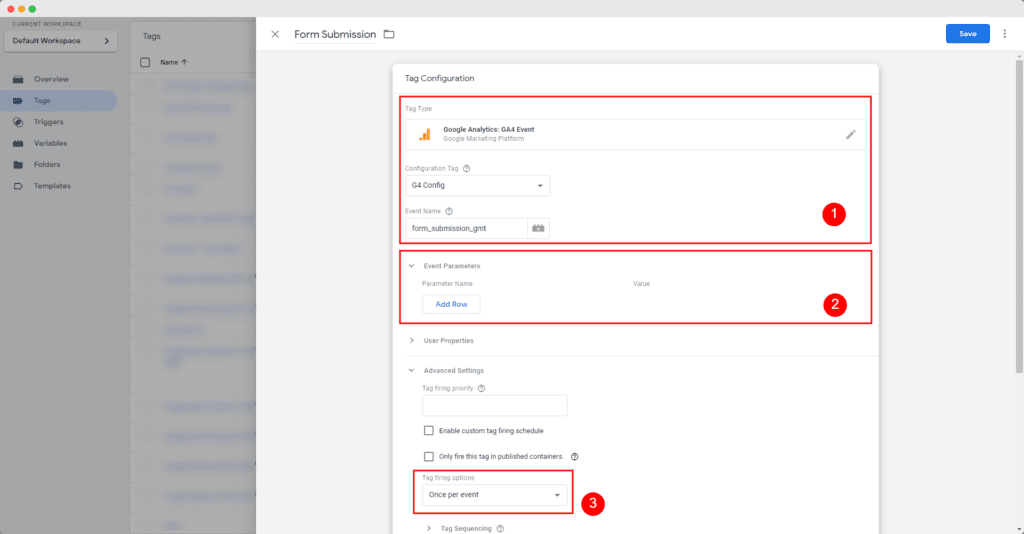
Now that you’ve got the basics of setting up key events in GA4, let’s dive into some best practices to ensure you’re making the most out of your tracking setup.
From adjusting the counting method to finding and reporting on your key events, these tips will help you get accurate and actionable insights.
Google Analytics 4 counts a key event every time it happens. If someone submits a form twice in a session, GA4 will count it as two events.
For purchases, every transaction counts, but for other key events like form submissions, it might not be necessary to count every single form.
To avoid counting the same non-purchase key event multiple times, you can change the counting method.
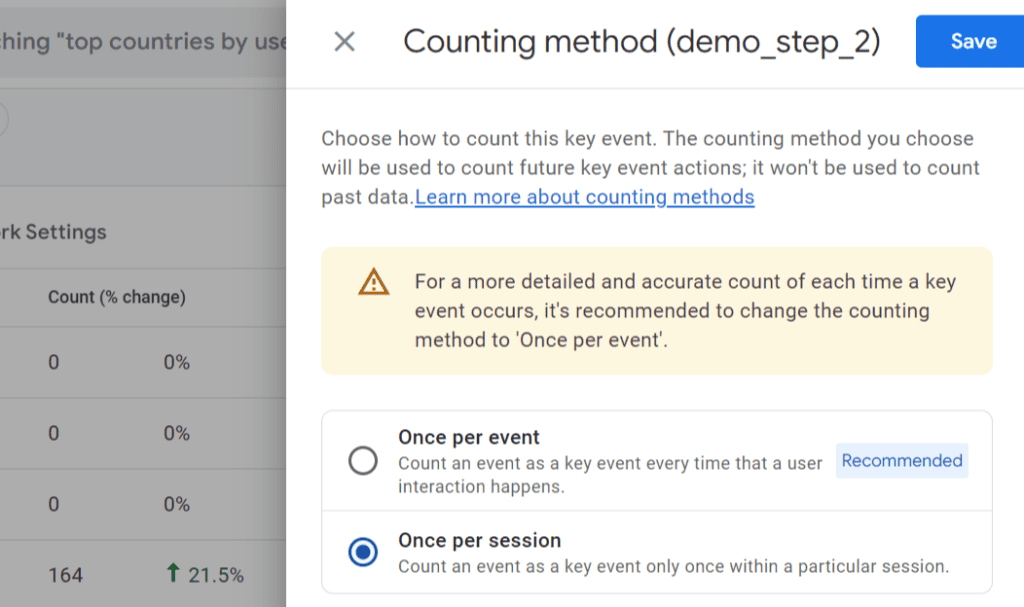
You will have two options:
Choosing “Once per session” helps prevent inflating your event numbers by counting a single form submission just once per session.
While this won’t eliminate all duplicates (since users might return and submit again), it provides a clearer overall picture.
Google Analytics allows you to add values to key events.
It’s like putting a price tag on each key event you track.
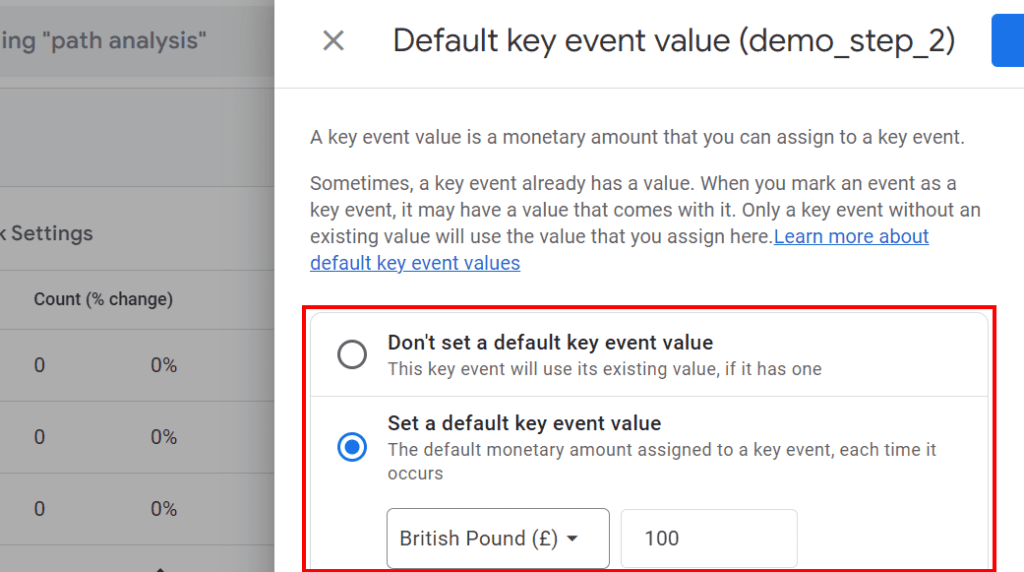
Let’s say you figure out that every form submission is worth a hundred pounds.
You can set that value in the key event’s settings.
To set this up, just head over to Admin > Data Display > Key Events.
Find the key event you’re interested in, click the three dots next to it, and select “Set default key event value.”
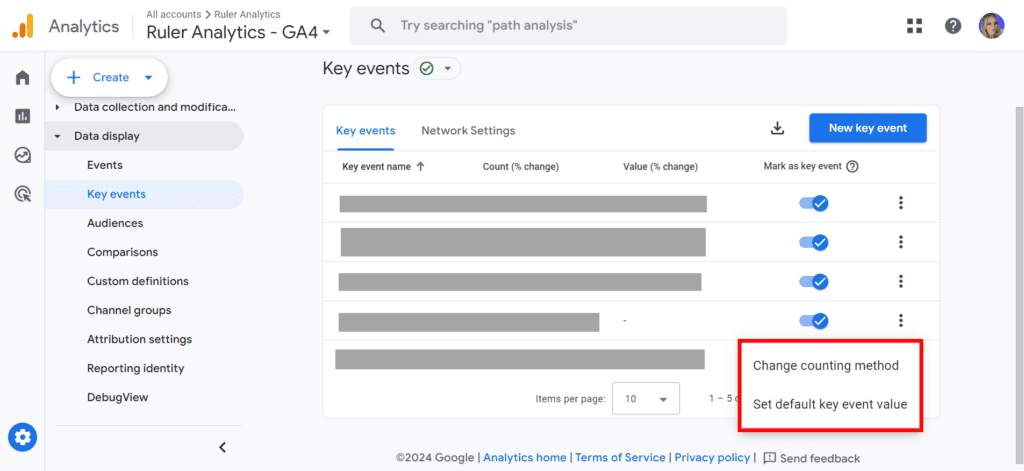
From there, you can pick your currency, enter the value, and hit save.
But here’s the catch. Event values are static, which is a problem for lead generation.
Leads don’t all convert the same way, and some channels bring in leads that are worth more than others.
That’s why more marketers are turning to attribution tools like Ruler. It tracks the whole customer journey, from the first click to the final sale. It captures details like the marketing source, page views, UTM variables, Click IDs, and Cookie IDs.
When a visitor turns into a lead, Ruler passes that marketing data to your CRM. This way, when a lead eventually converts, you can attribute the revenue back to the marketing channel that made it happen.
Ruler also integrates with Google Analytics, letting you use dynamic revenue values to get a more accurate picture of your marketing impact and ROI.
Pro Tip: Want to see Ruler in action? Book a demo with our team and see how we can help you better track and evidence marketing influence on pipeline and revenue.
You can use your traffic and user acquisition reports to track key events and measure how different channels and sessions are performing.
For example, you can see how many users are coming from Google Ads, how they navigate through your site, and determine how many complete form submissions.
If you have implemented e-commerce tracking, your key event data will also appear in your Monetization reports.
You can also customise your reports to fit your needs.
Instead of sticking to the standard setup, you can tweak dimensions, metrics, filters, and segments to spotlight the key events that tell the real story of what visitors are doing on your site.
To dive in, just head over to “Explore” in the left-hand menu and hit “Blank.” From there, you can play around with the different options and create reports that really shine a light on the stuff that matters.
Google Analytics is a powerful tool for tracking website traffic and user behaviour. However, there are a few reasons why it may not always be the best tool for tracking conversions.
One issue with Google Analytics is its attribution window.
By default, GA4 only tracks events for up to 90 days. While 90 days might sound like a lot, it can be a real pain for B2B marketers where customer journeys can stretch much longer.
For example, data shows that 75% of B2B companies need at least four months to land a new customer, and sometimes it takes even longer for more complex deals.
So, if your sales cycle goes beyond 90 days, you might be missing out on important touchpoints that contributed to your biggest wins.
And it gets worse. Google has ditched most of the rule-based attribution models, so you’re left with just last-click and data-driven attribution to allocate key events.
Google Analytics is a valuable tool for tracking digital activity, but it has limitations when it comes to tracking offline conversions.
Out of the box, Google Analytics can’t track phone calls.
If you have a phone number on your website and are using Google Analytics exclusively, then you have no way to collect conversion and revenue data about your inbound calls.
This isn’t much of an issue if your visitors use forms and other digital communication channels to convert into leads.
But if calls are an important part of your lead generation, it’s likely you have a limited view of your marketing effectiveness.
If you used the legacy version of Google Analytics to track goals, chances are a majority of your conversions were attributed to direct and Google search.
This isn’t necessarily because these channels are performing exceptionally well, but rather because GA4 struggles to accurately track top-of-the-funnel efforts.
There are a few reasons for this bias.
First, user behaviour has evolved. Users often discover products or services through multiple channels, including social media, display ads, and content marketing.
They may see an ad on TikTok, do some research, and then eventually make a purchase directly on the website. GA4, however, often fails to connect these dots.
Second, privacy regulations and browser restrictions have made it more difficult to track user behaviour across different channels.
Safari, for example, limits the lifespan of first-party cookies, making it harder to track users over time. This can lead to inaccurate attribution, as users who return to a website after a few days may be treated as new visitors.
To address these challenges, it’s essential to employ more sophisticated attribution models.
Impression modelling, for example, can help to match impressions to conversions, even if the conversion occurs through a different channel.
By using machine learning and Bayesian statistics, tools like Ruler can accurately attribute conversions to the channels that were actually involved in the customer journey.
Every channel, from TikTok to Facebook, gets its due recognition for driving conversions and revenue.
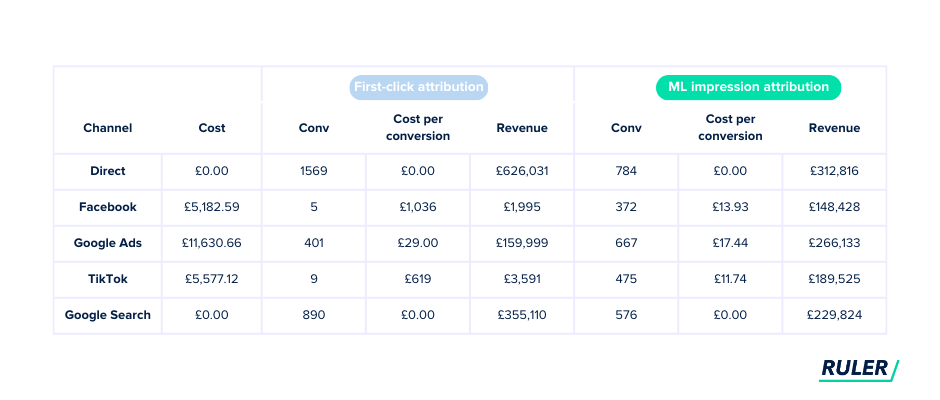
More importantly, you get a more accurate picture of how all your marketing efforts are contributing to your success, rather than letting GA4’s bottom-of-the-funnel bias skew your strategy.
We have a whole guide dedicated to impression attribution that outlines how it works and the ways it can support your measurement.
Setting up conversion events in your Google Analytics 4 account is a great first step to having actionable information that you can use to make smarter decisions.
But as discussed, relying solely on GA4’s event tracking can often provide an incomplete picture.
Ruler offers a comprehensive solution by providing a deeper understanding of your customer journey through tools like touchpoint tracking and impression modelling.
By leveraging these capabilities, you can level the playing field and ensure a fair attribution of conversions to the channels that truly deserve the credit.
Don’t just take our word for it. Book a demo today and see how Ruler can help you track and allocate your conversions and revenue more accurately.
